I had recently played a game of Jumbo Jenga, and had a blast with friends. Here's the set we played with:
So I decided that while Jumbo Jenga is pretty great when you have a lot of space, it might be better to have a Jenga kit that was slightly larger than normal, but not quite jumbo sized. It still needs a name!
First, I bought some stakes from the hardware store.
Second, I cut them up, and sanded the corners. Use a better tool if you've got it - maybe a chop saw?
Finally, I played medium-sized-Jenga. And it was perfect!
Lessons: not too much to see here. Very easy, just cut your boards to a length that's roughly equal to three widths, and sand the corners so they're comfortable to play with and so they don't catch easily on the pile of blocks. My blocks are about 5 by 1.75 by 0.75 inches, and the set fits nicely in a grocery bag. The number of pieces isn't crucial, but my set is 60 pieces (20 rows, to start), and that seems perfect.
I think I'll allow the winner of each game to write their name on one block; after 40 years we'll tally it up.
And finally, in case you hadn't heard of it, there is a game called Fire Jenga. Haven't played it... yet. ;-)
Some extra keywords for the crawlers: homemade home made jenga wooden block game wood shop class woodshop project
I recently found a necktie that I wanted to alter into a bowtie. I figured with all that length there'd surely be some guides and patterns online to do a quick conversion.
Not so.
There are plenty of guides for *tying* a necktie into a bowtie form, although I have to say they look super crummy, and you've got a long skinny tail tucked inside your shirt that *you* know about! So I set off to make my own bowtie all by my lonesome (well, with a bit of help from my sweetheart!).
First, seam-rip the entire tie, except the main thick portion, which you probably want to keep as a tie bottom, but use as a faux-pocket square. From the tip of the tie, save about 8 inches. Fold up and sew the edge you saved.
Don't cut the little stitching that holds the two sides together,
or you'll have to fix it lamely, like I did.
Okay, now on to the tie. You've seam-ripped the rest of the tie, and can take the liner out of it if there is one. Won't need that. We have to have two equal pieces of fabric to sew together. Hopefully your necktie has enough. If not, grab another necktie and make your bowtie double-sided! Iron any ex-necktie so that it's easier to work with, and looks better when it's done.
The two pieces of fabric I used,
one from a necktie, the other not.
Trace one of your existing bow ties onto the fabric, with about a quarter inch of space all around - extra at the curvy 'bowtie' parts (maybe 3/8ths of an inch there) -- I learned this the hard way. Pin the two ties together, with the 'fancy' side of each fabric facing in. Once it's pinned around the edges, start sewing the two ties together, only leaving about 1 inch, at the bottom of one of the tie parts un-sewn. This is where we'll pull it right-side-out from its current inside-out orientation.
I left a large un-sewn part at first,
but then realized the error of my ways.
(Click to Zoom)
Okay, now pull it out, I found it easier to 'push' it out using a chopstick. Now that it's correctly oriented, trim and tuck the remants inside and hand-sew the remainder shut. You won't notice the hand sew, as it'll be behind the vertical band of the bowtie.
Use the chopsticks to poke the entire
tie through the opening you left.
(Click to Zoom)
Use the point of the chopstick to get the corners all pointy.
Note how the hand-stitching is visible, but if you're better at sewing you
can use a more stealthy stitch and make it truly invisible.
(Click to Zoom)
Iron it flat the way you like it, and, Ta-Da!
Red, storebought tie with unsightly adjuster thing.
Blue and gold home-made bowtie from necktie.
(Click to Zoom)
For those not familiar, a Kickstarter campaign is a project that a founder sets up, to try and raise money for something they think is a good idea, but don't have funds for. If the idea is good, and others pledge past a certain threshold to contribute to the idea, the founder is delivered the funds and gets to chase down their dream. If there's not enough interest, no funds are transferred, and the founder has hopefully saved some time in realizing there might be a lack of demand for their project.
(Mild) Justification for Tip-giving
Over the past year and a half, I've contributed to a number of KickStarter campaigns, from environmental in nature, to just plain silly, to high tech in nature. Sometimes I'm late to the show and am happy to push founders over the edge, and other times I can't pledge fast enough when the project goes live. (In those cases, I really wish the project was listed on CrowdFunder.com, and I could gain equity in the company! More on that in later posts!) One such project which I'm funding is the uber-successful Pebble: E-Paper Watch, which I pledged to a full month before it's close. In short, I review crowdfunding sites frequently, and pledge to what I believe are excellent ideas which need to see the light of day.
Separate from my own funding of ideas, I've had a few friends run KickStarter campaigns. While some have done well, others have learned there isn't quite the market of which they'd dreamed. I've gathered some of their feedback here, in the hopes that it might help other, great-idea-people find the success they're after.
Finally, I've been doing some reading. Here are two of the recent articles which reference lessons learned in KickStarting:
Tableau Dataviz: Kickstarter - in which our minds are BLOWN by the interactive graphic allowing you to delve deeper into the KickStarter data.
Tips
Launch with Momentum - before you 'go live' and deploy your project, take the time to build a buzz with eager buyers. Prime your family and friends that this project is coming, and that you'd love their support, and get their feedback. As Seth Godin (here's his KickStarter campaign) and Jeanne said: “Kickstarter is the last step, not the first one.”Kickstarter is not a way for you to attract attention to your project. It is a way to “organize and activate [your] tribe”. But you have to build your tribe first. Many seem to hope and rely on the deeper web for support: blogs and random visitors who might stumble on your site after a websearch. In all likelyhood, you will get some of these, but these folks will probably only count for a small portion of your support - realize this!
Launch with Momentum!
(We'll say the yellow line is 'pent-up-buzz/people waiting to pledge' and green is dollars invested (yours being the first few).) I realize this is a horrible graphic.
Make second-degree sales easy - Your friends and family may happily support you financially, but this may not fully enable you to reach your goals. Put some serious time and tools into really leveraging the second-degree of your social network. Make it as easy for your first-degrees to pitch your project to their first-degree network - use this in conjunction of the primer as well! You may find someone who wants to help you make an amazing video, before you've even made your mediocre video! After these second-degree tools are proven on a small scale, and the project is deployed, then ASK for them to promote. After all, it's your friends' and families' product now, too, and they want it to tip! Give them tools, and ask them to use them!
Make second-degree sales easy! Give friends and family the tools to promote you! Image from: http://blog.brosix.com/
If possible, have a separate web presence from your actual fundraising page. While fundraising pages present a comfortable environment for prospective supporters to learn about your project, many will want to gauge whether you'll be effective with their money. By linking your full Facebook / Twitter / LinkedIn profiles, you'll show that you've been down this path before, that the project is within your grasp, and that their money is going to a worthwhile cause. Related: Why not register the domain and host a landing page - to show you're serious and in it for the long haul. This shouldn't cost you more than $20, often much less (I've got a bunch for ~$10 each).
Get an easy domain / website.
(Yeah, it's an affiliate link. A kid can dream.)
Of course, if you don't have a long history in the field, and this is really a fresh start, then your website won't have any content. In that case, why not use the snarky domain you've picked out to help attract new supporters? Have the domain forward to the fundraiser site - and spend $50 (or get some free) business cards with QR codes to hand out at related venues (kiosks in malls? clubs? It's all product-dependent, but these are cheap and are somewhat sticky. (Moo.com will give you free ones if you have an about.me acct!)
Have one, central presence on the web, to which you can refer friends, fundraisers, and acquaintances. I like about.me
As Jeanne said, "Make sure you have a video. All else being equal, a project without a video only has a 15% chance of success while a project with video has a 37% chance of success." Related to this, make it easy for people to see what they're getting into. If it's a simple product, the product photo is only half the equation - the price is the other half! Don't make them dig, make it easy to pull out they Paypal password: On the title frame that shows before/after the movie, put the price in the corner, if it's low. Make it easy for them to think about supporting!
Now, this is getting nitpicky, but point out that there's a movie. Some fundraisers just use an image, so some viewers don't even notice the movie. And we know that movies work! Keep people on your site, glued to the screen. It opens wallets.
Finally, two things:
Feel free to share your project with me, before or after it's launched! I'm always up for giving feedback, and may want to pledge to your project as well!
Lastly, know that there's a plethora of different websites out there for crowdsourcing your project. Here's an excellent resource to find some! Now go start your project!
Here's just some search words:
BEZL: the iPhone anti-case, Cryoscope: A touch-based weather communicating Device, Pebble: E-Paper Watch for iPhone and Android, A Moveable Feast, Meet the Hugalopes - the future of fluffy, fluffy fun..., Twine: Listen to your world, talk to the internet, BirdProject: Biodiesel Glycerin Soaps for BP Oil Spill Cleanup, Facebook
Recently a couple of friends and I got together to make a 'kidwash' similar to the one shown below:
There's links to make this type of thing floating around the internet, but we all thought they were a bit... trivial! We wanted to make something we could be proud of, and that we'd enjoy using, as adults. We wanted to do a quick-and-dirty project and reap the refreshing benefits. There are three quick videos below, and then a walk-through with parts pseudo-details. Enjoy!
Turning the system on, and noting an easily-remedied failure:
Action movie of the (Big) KidWash (no slipping-n-sliding, sorry; we did that off-camera):
Pseudo-details:
Our total project cost was $100, and was spent between the hardware store and the dollar store where we procured silly whirly-gigs, misting hoses, and jets. We only used two tools: a pvc tool (not a saw; buy the tool, it's completely worth it (~$10)):
And a rubber mallet (~$10):
We decided to make one rectangular portion roughly 6 feet high, for us adults, and adjacent to that, a 4 foot high square, that the slip-n-slide could run under. We didn't really have plans, and it was a lot of fun to just measure by eyeball and cut to fit. It turned out perfectly (click here to enlarge):
It was pretty amazing how the PVC held together on its own, with simply some mallet hits. We didn't end up using PVC primer/glue, and the water pressure didn't blow any of the joints. The whirly-gig spun easily, and the long range jet acted fine as well. The structure was stable, even when filled with water (despite not having any cross-braces).
We used 3/4 inch, schedule 40 pipe, all around, with the exception of the small risers that went to the lawn sprinklers. All of the adapters were readily available, though we did have to use some re-sizers a few times for this non-traditional use of PVC.
We used a 360, 180, and 90 degree sprinkler for various purposes.
After we tested in the parking lot, we transferred it to a friend's back yard and let the real product testers ge to work. Everyone had a blast! (We did have some pool noodles and big car-wash sponges nearby, but didn't hang them, like others have done.)
The slip-n-slide runway, as well as the hose hookup, near the ground, minimizing tripping.
The runway has two garden sprinklers, a long-range jet for the far end, and a misting hose running alongside it.
The whirley-gig that spins around on top, making sure anyone within an 8 foot radius gets wet.
Here's the misting hose that runs along the slip-n-slide to ensure it's always a bit wet, and so we don't have to continually throw buckets down.
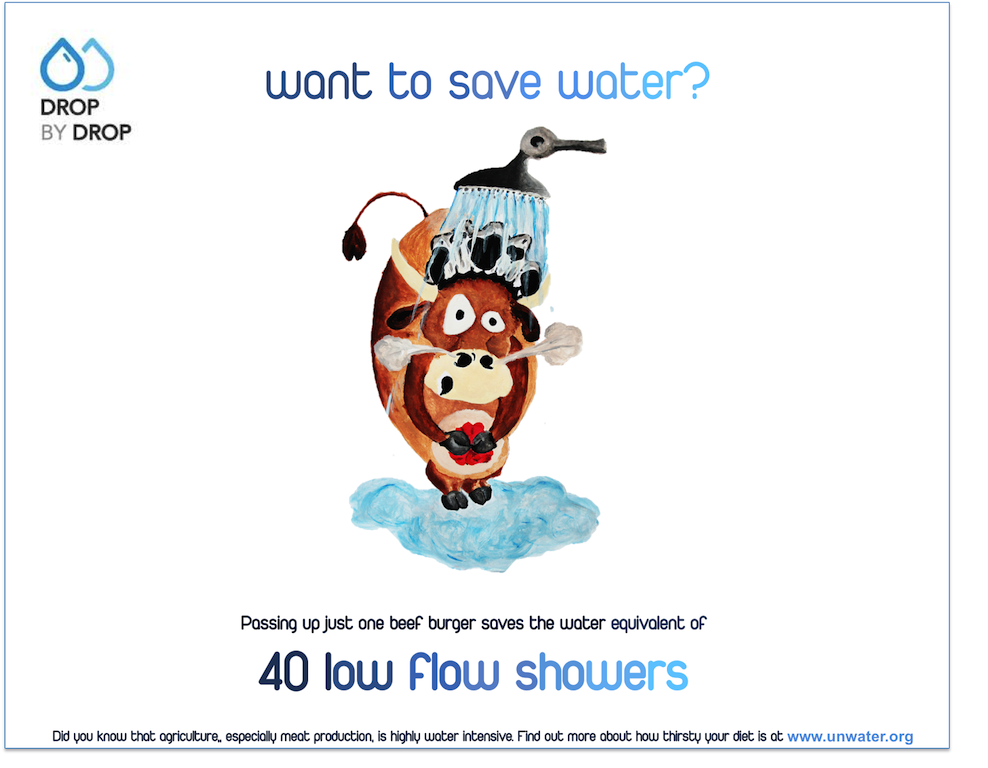
And for those environmentalists worried about wasting water while we live in a desert in Los Angeles... you're right, we're wasting water. But on the brighter side, two out of the three adults who made this are soft vegetarians, so I figure I save a reasonable amount of water that way, offsetting this expenditure. (1 year of daily 7 minute showers equals approximately 1 pound of beef.)
Wanted to share a friend's blog post which grew out of a conversation we were having a few months back, following on the tails of a separate post about aging that I made. Below is Aaron's take (in full) about aging, as he turns the corner to the youthful age of 40.
The math of turning 40, Time Dilation and Back to the Future
Second, I'll be turning 40 pretty soon and it got me thinking about the phrase "middle age". It's always been my observation that life is "speeding up". When I was a kid, the time between Christmas from one year to another seemed to take an eternity. Yet now, I struggle to remember that 1993 wasn't 9 years ago, but 19! What's going on?
My theory is that we are terrible at tracking time. Instead we can track "relative time". When we are six years old, the time from one Christmas to the next is fully one sixth of our lifetime - in fact, given that, at age six, we may not have any memories earlier than age three, we could conclude that each year is fully a third of our existence. However, once we reach age 40, each year is only a sliver of our total existence, and thus seems much smaller. This seems to be the only reasonable explanation of where my 30s went in a blink of an eye.
So, I decided to model this behavior and see what I discovered. I made the initial assumption that our memories start at age 5 and end, with death, at age 80. I then figured out the relative length of each year, to determine how long each year feels to us. The results are interesting:
Let's first look at the cumulative chart. This example takes the relative age for each year. By measuring the areas under the curve we can determine the age of equal "relative age", or the ranges of ages which should "feel" the same period of time, taking into account the apparent acceleration of the years.
This shows that the first quarter of our life is over by age 10, the second by age 20, the third by age 40, and the last quarter, by age 80 (which, if you think of the math, makes perfect sense). If I think of my childhood, this also feels right as well. My teenage years, which technically lasted as long as my 30s, were a lifetime! My 30s, I believed, happened when I went out for lunch one day.
So, the horror that we can realize is that 40 is not middle age - 20 is! By the time you reach 40, you've lived fully 75% of your apparent life timeline. Even though you are halfway through your life, the remaining years will seem like the blink of an eye.
Another way to look at this is with this graph:
This lets us determine what age corresponds to the percentage of apparent life lived. For example, as shown, the age at which you have lived 60% of your perceived life is actually 25. On one hand, this is a clear call to enjoy your youth, on the other hand it shows that we've all been given the gift that our youth lasts a disproportionately long period of time - which is great if you had a good youth, not so great if you didn't.
Now, interestingly enough, these results are driven by the assumption that you have perfect memory of your life, and thus each minute seems progressively quicker than the minute before. This leads to some interesting conclusions. The first is that there is a real cost to memories - their cumulative effect serves to make your life appear to go quicker. So, if at all possible, there's little point fixating and hanging on to bad memories. Relieving them serves to slow down the perceived acceleration of time. As well, there is possibly the saving grace that, as you age, your memory of earlier events starts to diminish. This will put more relative weight in the later years and appear to slow time down. Looking at the first graph, if you were able to forget the first 10 years of your life completely, then the effect is dramatic on shifting the relative weights of the later years. Is it possible that there is some benefit to dementia and memory loss in your later years? I doubt the benefits outweigh the dramatic costs, but it's an interesting thought.
This also leads to some conclusions about kids. As I watch my kids grow up, I get to experience, vicariously, their experiences. While overall life is zipping by for me, and they are growing up at an incredible rate (from my point of view), they also help to slow my life down by providing an external reference point to my life. Time dilation may be part of Einstein's theory of relativity, but its also alive and well between two people at dramatically different points of their life.
So, as I round out the first 75% of my life, and I see that we are almost in 2015, the year at which Back to the Future will be as far from me as 1955 was for my Dad when the movie first came out in 1985 (and led him to say that he felt old!), I can really question the phrase that "life begins at 40". If it does, then life sure felt like it took a long time getting started. Enjoy every moment that you live, and savor every good memory you have. Even if you live to 80, you're just not here very long.
To my many and important blog followers, I thought I would share a great thing. Grateful160 is a free website that sends you a text or email one to four times a day. All you do is respond quickly with something you are grateful for and it records it. It keeps a record online for you. It will send you a record every week too.
It’s great to have a record. But the best part is definitely the reminder to be thankful each afternoon. (Thanks to TannerTimes for reminding me to share this sentiment!)
But why should we all start recording our thankfulness?
Research continues to show that a major portion of individual's happiness is derived from their attitude, and that being grateful for the good things in your life is one way to have a better attitude. Check out the various sources here.
While we're on the subject of happiness, I should really point out that there's an entertaining documentary that I watched on WORLD HAPPY DAY back in February; here's the trailer for Happy!:
(HAPPY (and here) is now available on DVD and iTunes in US and Canada!)
Finally, there's a few TED talks that you can watch on the subject, here. You'll see some common themes throughout all the research - one of which is to be grateful.
So take the first step, and sign up for this awesome daily text message service!
+(Medium).JPG)
+(Medium).JPG)
+(Medium).JPG)
+(Medium).JPG)
+(Medium).JPG)
+(Medium).JPG)
+(Medium).JPG)
+(Medium).JPG)
+(Medium).JPG)
+(Medium).JPG)
+(Medium).JPG)
+(Medium).JPG)
.jpg)
.jpg)
.jpg)
.jpg)
.jpg)
.jpg)

.jpg)
.jpg)
.jpg)
.jpg)
.jpg)
.jpg)


.jpg)