[UPDATE #3: Check out the newer post / summary here showing some of the improvements, as well as simple schematic, etc.]
[UPDATE: See end of article about materials used and height differential! Also new pump notes!]
Just wanted to share pics and tidbits on how my roommate and I decided to heat our pool without breaking the bank. While commercial estimates were coming in at between $5000 and $6000, we managed to heat our pool with a weekend of work and about $300 at Home Depot, and about $100/year in electricity.
I should also note that I didn't come up with this method, and that two good friends, JM and DB, did something very similar before me, and we all learned a bit from various websites, including
Solar Pool Heating.
Being in southern California, our pool was about 73 degrees in the afternoons of late June. This was certainly warm enough to enjoy, but we wanted to prepare for the winter (and to see how hot we could get it this summer!). I'm happy to report that our temperature is now about 86 in the afternoon, and still rising daily.
We start with a submerged pump in the pool. Since we happened to have two free, smaller pumps, we hooked them up in series. They're driven by a 110 VAC outlet, and controlled by a simple daily lamp timer.
 |
| Pumps in Series (not req'd if you just get a bigger pump) |
 |
| Primitive Control & Measurement |
Next, the output of the pumps goes up onto the roof via some black drip irrigation tubing, 1/2" diameter, and coiled about 45 times to finish at around 6 or 7 feet in diameter.
 |
| 2 of the 6 coils, the other four are on the south facing side of the roof for now. |
There are a total of 6 coils, 500 feet each. The pipe comes in rolls of 1000 feet at Home Depot for $80 (we used DIG corp,
SKU # 642176), cut in half for more manageable handling.
 |
| 6 Coils of pipe. Roughly equal to one third of our pool top surface area. |
The construction of each coil is designed to be inexpensive. Just PVC and some zip ties. Use a wooden block to space out the PVC as you start, and use zip ties liberally to keep the coils in order. Get two spinning tables (lazy susans, office chairs, be creative!) and directly spool from the supply to the PVC. Two people work best, though it is doable with one.
 |
| One pretty coil. |
 |
| Sample coil showing PVC construction |
We decided to split the water into two channels, and have each channel run through three coils, from one to the next. We're still debating what the best speed is for the water, but this seems very reasonable. I guess we could pump faster, though it is mid-day at mid-summer, so maybe we'll want that slow speed in the winter.
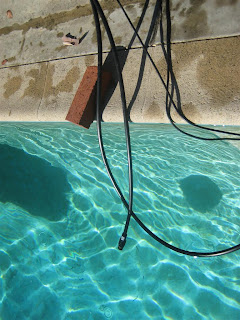
The pipes are held together with simple press compression fittings. I'm astounded at how they don't leak air at all. I think they're magic.
 |
| Sample joint |
Then the water returns to the pool. I just measured the water coming out of the hose at 2pm to be 114 degrees F.
UPDATE: We have had an issue lately with the black tubing on the roof collapsing due to the vacuum being pulled by the water wanting to flow down both ends of the tube when the pump is off. Not sure the solution yet, maybe a more powerful pump to overcome this when it kicks on, or maybe a second pump on the roof? Maybe the black tubing is just not structural enough. Thoughts and suggestions?
UPDATE #2: Thanks for the suggestions in your comments. We upgraded to a surplus pump that is definitely oversized -- one half horsepower! The flow rate is high, but we still get excellent thermal transfer; the water comes out nice and hot despite it being fall now. We followed Dan's suggestion and bought a pump here. The pump 'inflated' the hoses just fine and we have been running for a few days without incident. Will re-update here, if we run into trouble!


Nice writeup Holden. Interesting facts would be the height of the roof and the ratings of the pumps (CFM, Amps) to help spec out a similar system.
ReplyDelete(I like the photo with the bus in it!)
Good call, Jos!
ReplyDeleteThe top of the roof is roughly 15 feet from the surface of the pool.
The pumps are submersed on a ledge about 1 foot below water, and are 110V, 3.5 Amps and 1.7 Amps each. We find that the second pump really helps during startup, though if the system is well primed, only the larger pump is required to sustain pumping at a good clip. (Free pump = using it still.)
Also, of note, if the system leaks at all (which ours doesn't, magically), or when the coils are emptied, the coils need to be filled by a garden hose (approximately 50 psi), as the pumps can't lift the water, they can only circulate water. Remember, the outlet hose actually generates a vacuum on the roof coils, as the water gets pulled down by gravity.
And thanks to Dad for pointing out the zip ties that are white will wither over time with the UV exposure. Went ahead and did a quick fix by coating them, and the white pipes with black spraypaint, so that the visual footprint is lowered.
ReplyDeleteHello! I am planning on doing this to my own pool. Have you noticed a heat increase inside your house?
ReplyDeleteI haven't noticed any change in temperature. But if anything, I expect a decrease in house temperature. The solar load on the roof shingles is now getting put into the pool! Put another way, if it's 100 degrees outside, and you continuously pump colder water (80degrees) onto the roof, you'll cool your house!
ReplyDeleteThat heat that is going into the pool is coming from somewhere! And its being displaced from heating something else (your house)!
Questions- What is on the end in the pool return? A check valve? What are the horsepowers of the pumps? This is very cool ( or hot I should say). What is the overall diameter of each coil? I live in Ontario and hope to augment my season and use the gas heater less. Any suggestions on an optimum size pump? Thanks
ReplyDeleteThis is very cool indeed - so much so that I've tried to replicate this with my 12 foot diameter 30" deep INTEX pool. Figure I can get good heating with just one 500 foot coil and my 1800 GPH pump I purchased on Amazon. Tested it yesterday and while the water is coming out very hot (probably close to Holden's temp) it's not coming out very quickly. The pump doesn't require priming, but can I pick up the pace of the overall flow rate? Is there air in the coil? The coil sits right above the pool on top of my patio covering (pergola). Probably only 8 or 9 feet of elevation change. Any thoughts? Bigger pump? Very cool!
ReplyDelete@jocam, regarding your questions:
ReplyDelete1) The end on the pool return is not even a check valve, it's just a straight exit; the water will not empty out, as both ends are under water!
2) Our larger pump is 0.59 HP.
3) Overall diameter of each coil is approximately 6 feet.
4) Regarding pump, we use a garden hose to fill the tubes on the roof, because the garden hose is at high pressure (50 or 100 psi), and then we use low pressure pump to move the water around.
@ChrisC, something to try is to get an adapter and hook up your garden hose to flush out the air bubbles from your system. I'm not sure what pressure you have there, but we're on a large hill, and even at the top of the hill have over 50 psi (somewhat astounding!).
ReplyDeleteAfter you have the hose filling the pool (via your tube), then put the coil intake under water, unscrew the hose, and hook up your pump. I'm betting you'll see some better flow. And if you don't have any leaks, you won't experience any loss of flow rate*, as the water going into the pool, off the roof, creates a vacuum pulling water up onto the roof.
* Because we're currently investigating some collapsed tubes and lower flow rate, possibly because of this very vacuum. :-\
One option is to get a stronger pump. I use a stronger submersible pump: https://www.surpluscenter.com/sort.asp?catname=water&keyword=WPSA and I have unintentional leaks in the solar water heater on the roof. The stronger pump is able to prime effectively, so it works great.
ReplyDeleteDid you start laying the coils from the center or outer ring?
ReplyDeleteI continued to struggle with this, going down to a tiny waterfall pump (that was rated to 12 foot lift) all the way up to a high flow rate 0.75 HP pump. No luck. I did prime the coil with the garden hose - got great flow through the coil back down into the pool so there's no blockage/kinks, etc. Someone else advised me there may be too much backpressure because it's all one big coil, and suggest I split it up into parallel smaller coils. Other than trying that I am at a loss!
ReplyDelete@Chris, thanks for your comment. I'm not completely sure what is plaguing your system, but I would concur that there's a high likelyhood that it's backpressure (major head loss). Did you find any time to re-plumb the system? You could cut the coil halfway through, for testing, and always re-join it later!
ReplyDeleteWhat length of pipe do you have? We have about 1500 feet and our 0.5 hp, high flow pump has no issues at all. Keep me posted, I'm curious about the challenges and solutions!
-Holden
Your making a mistake by running all that tubing as one long tube. Use PVC 1.5 inch pipe and make a 2 headers using T connections that allow for a 3/4 threaded too 1/2 nipple installed.Space evenly on each header. Connect coils to a bottom inlet header and outlet to a top header which returns to pool.Then using the pools pump connect to the 1.5 header and stand back ! The heat you will absorb will astonish you.Also keep in mind FLOW ,you want to turn the pool over as fast as possible drawing any accumulated heat in pipes to pool. So don't look for a huge return temp difference ! If it is a degree that is ok, the key is to transfer all the heat collected by black tubes to the water and that can only be done with good flow.. GL
ReplyDeleteI always thought that water was like electricity and would take the less resistant route. What guarantees that the water is circulating properly in all the coils? You'd have to put manual valves to control the flow to each coil? Wouldn't having the pipes in series be better?
DeleteHi Anonymous. I think that I understand your question, but not quite sure. The coils don't leave any option for the water -- there's only one path to go. The water is drawn in, through a pump, then into the coil system, finds its way through the coils, and then empties into the pool.
DeleteI put a small schematic showing the actual coil arrangement in a newer post, please take a look:
http://whereisholden.blogspot.com/2012/04/thermal-solar-pool-heater-summary.html
Due to the strength of our pump, we wanted to slow down the water a bit, so it could get even warmer, before going back in the pool. Depending on your pump, and coils, you're right -- only series might be better. Try out a few different arrangements! This is science! Experiment! :)
@Anonymouse (or GL?), I guess I may have failed to mention that we did settle on a partial series, partial parallel setup. Basically the one tube going up to the roof separates into two tubes, each goes through three full coils before rejoining and back to the pool. Our flow rate seems pretty high to me, just had a friend measure it as 15 L/min which is almost 240 gallons per hour. So maybe we could go higher, but it's not a trickle. :)
ReplyDeleteWe decided not to use the pool filter pump as we're just renting the house and didn't want anything too permanent / invasive. We've been really happy with the new pump from the surplus shop.
-Holden
Thanks so much for this write-up. My girlfriend and I made ours over 2 or 3 weekends. One suggestion that I would offer to anyone looking to do this is to cut the PVC crosses at slightly different lengths. The top cross should be ~6 inches shorter than the bottom one. This makes it much easier to guide the black piping into the coil when winding. It also makes it easier to attach the straps over the ends when mounting to the roof.
ReplyDeleteHolden,
ReplyDeleteQ1. How have you addressed the potential for shock with the submersible pumps?
Q2. Which specific pump model did use from the Surplus Center?
Hi,
ReplyDeleteawesome write up. on my way to setup a similar system. I have about 15 feet lift and plan on using 3 to 4 coils at 500 ft each.
would anyone have a schematic on how to connect 3or4 coils? i read that I dont want to connect them as one pipe. would the use of check valves help ?
whats the exact pump model you used ? also does anyone use a self priming pump ?
cheers
pete
Hey folks, specifically Anonymous and pete@cbxx:
ReplyDeleteI gathered some of this information, as well as some newer details in a new blog post, here:
http://whereisholden.blogspot.com/2012/04/thermal-solar-pool-heater-summary.html
Pete- if you have your 3 or 4 coils, just set them up, if you like the flow, great, if not, reposition them with some t-valves in another orientation (serial vs. parallel) until you're happy. You'll cut off about 3 inches of pipe each time you plug it into something (actually unplug it), so just leave yourself a bit of slack.
Best of luck!
great ideas but can i TEE into my pool pump and return with shutoffs when it gets to warm...and only run when the pump runs or should i use a secondary pump just for the solar heating and how well would just a 1000' work? thanks in advance
ReplyDeleteDear e5875a.....,
ReplyDeleteYou can do this, but you might want to check with whoever set up your pool pump. Adding this extra run would definitely have an impact on the pumping ability of the existing filter pump.
One downside is that you won't be able to run them at separate times. From what I hear, it's smart to run your filter pumps in the afternoon to avoid algae growth (UV exposure, etc.), though at the same time, you could make an argument for less expensive electricity at night (depending on your metering).
I preferred to use a separate pump as I was just renting the house, and so I didn't want to affect the existing filter pump system.
There's more info on my SUMMARY post here:
http://whereisholden.blogspot.com/2012/04/thermal-solar-pool-heater-summary.html
-Holden
Its looking like high power engine may i know how many cc it is ?Holden
ReplyDeleteHi,
ReplyDeleteI'm a single woman living in Spain and although the sun does a good job of heating the pool in the hottest months, it doesn't actually come round onto the pool until late morning, so mine is always a few degrees colder than pools that get the sun all day. I have no other heating system so at the moment my swimming season is short. Anything "solar" is ridiculously expensive here, so I've been experimenting with a tiny submersible pump and some garden hose. It works in principle so I'm now ready to try something more ambitious. My house is 4 stories high and has a conical roof over a tower, so using the roof isn't an option. However, I have a long wall which is about 5' high 70' long and about 12" wide, along one side of the pool. It then turns at right angles, drops to a height of 3'6" and runs along for about another 15'. So my plan was to run tubing along the top wall in lengths going backwards and forwards, then drop it to the lower wall and do the same. I could then come down to garden level and put some coils in as well if necessary, before running the water back to the pool. I also thought it would make sense to use a solar powered pump, working on the assumption that if the sun is hot enough to power the pump it will also be hot enough to heat the water in the pipes. So, given that I know absolutely nothing about plumbing or electricity, I'm wondering if you think this plan might work and would also like some advice on whether a solar pump would be powerful enough. Your help would be very much appreciated, especially if you could respond using very simple terms that a complete novice can understand!!!
Mazzy, seem my reply below. Did you make any progress? Did you find anyone who might be able to carry out a project like this? Photos!
DeleteMazzy, sorry for the long silence. (Note, did you read the newer posts referenced at the top of this post?)
ReplyDeleteI would highly encourage you to first cover the pool with something that will keep the heat in. As discussed here (http://www.builditsolar.com/Projects/PoolHeating/pool_heating.htm#Cover), that's the first order of heating a pool. It makes the largest contribution for lowest effort. You could buy some "Solar Rings" or for much less money make some lily-pads or something similar that are easy to store, if you don't want to use a full-length cover (they are hard to fold, etc. See here:
1) https://www.youtube.com/watch?v=HGdxvDM5IKg
2) https://www.youtube.com/watch?v=bUZd_fAQnQk
Regarding using a pump and coils - it will be much cheaper than any photovoltaic (PV) system you see advertised, but I would do it with caution, and hopefully get some help from someone in town, due to the extreme heights that you are dealing with. If you do decide to go after it, start slow (maybe one set of coils) and measure with a thermometer, estimate the performance of the pump, and then grow the system from there. Best of luck and happy, warm, long-season swimming!
I built a similar solution.
ReplyDeleteHere are the differences that I had to do to be successful.
To get around that hose collapse, i put a air relief valve in.
http://www.irrigationdirect.com/1-2-mpt-air-vacuum-relief-valve
http://www.irrigationdirect.com/pf-1402-005
My roof is much higher so i had to separate out each collector.
One issue I had with this is it seemed like most of the water was going to just one collector (the one with least resistance)
INPUT__________
@ @ @ @
-----------> output
I plan on changing it to have each collector's output to go all the way to the pool. Then i will get a ball valve on each one to regulate the flow. If one is flowing more than the others, adjust it until they are even.
Thanks for the input, Scott! Any improvements? How's your temperature this December been?
DeleteHaven't ran the heater since last fall. I dont want to swim when the air temp is too cold. :-)
DeleteClean the pool filter and skimmer and make sure that any visual debris has been removed prior to installing the heater in the pool.
ReplyDeleteyou really described well on these devises.Is it possible to make use of sun energy for residential and commercial purposes. If yes then how much initial cost is required for them.
ReplyDelete@solar water heater system - I'm not sure what you mean by "residential and commercial purposes" - do you mean heating up air to raise the home/building's ambient temperature? or perhaps for a hot water heater (geiser)?
ReplyDeleteThis design review is specifically for a residential pool, but could be adapted for a hot water heater (geiser) for using water quite easily. Best of luck, and feel free to write more specific questions!
Keep it up.I would state that you possess lots of understanding on this subject and you wrote outstanding.
ReplyDeletesolar water heating
This comment has been removed by a blog administrator.
ReplyDeleteThis comment has been removed by a blog administrator.
ReplyDeleteThanks for your marvelous posting! I actually enjoyed reading it, you will be a great author.I will ensure that I bookmark your blog and will come back in the foreseeable future. I want to encourage that you continue your great job, have a nice weekend! think you've made some truly interesting points.
ReplyDeleteWow! I want to learn how to do this too! Can you post every single material that you used and the step-by-step instruction on how do it? So I can ask my father to do it for me. Haha! It would be really nice to soak myself in a cold pool during summer and let off some steam.
ReplyDeleteSorry, not willing to do that - there's more than enough information here to make the project a reality. If your dad does end up making one, maybe you could do some documentation of his work and post an instructable - photos and shopping list?
Delete(Is your dad an AC repairman? If so, I'm sure he'd love to help you on this project!)
This comment has been removed by a blog administrator.
ReplyDeleteHi Holden,
ReplyDeleteThank you for the great idea! We are going to try this here in Vermont with just two spirals. (We have a small pool.) Right now, the water is a cool 60 degrees on May 4th. Hoping to swim soon by using solar power! I will let you know how it goes.
Best, Mary Alice
Awesome, glad to hear you're taking the 'plunge'! If you don't mind, report back! If you have pictures you want to post, I'm happy to let you write a guest post, and hopefully help others with whatever you come up with!
Deleteinstead of upgrading the pump, couldnt you have put a check valve so no water could flow back down the tube? i'm just curious. i am buildingo ne myself.
ReplyDeleteJoshua, you could definitely try that out. We tried it and found it to be only partially useful, so we took it out. I seem to remember it either leaked, or leaked enough air so that the water came out the other end of the tube (maybe use one on both ends?), can't quite recall. :) Report back your results!
Deleteok will do :) i am having trouble with the fittings ATM.. I use clear braided hose at work so i thought the 1/2 inch barb to garden hose fittings would work, but i tried with gear clamps as well as the ones that you crimp. failed miserably haha. i have to go back to the Home Depot to find actual drip hose fittings. i didn't see any at first glance..
DeleteThis comment has been removed by a blog administrator.
ReplyDeleteThis comment has been removed by a blog administrator.
ReplyDelete